

How To Clean Moldy Tub Caulk
 Bathroom Mold Cleanup
Clean up Tile Grout Joints, Remove Bathroom Mold, Prevent Future Mold Growth in Bathrooms
- POST a QUESTION or COMMENT about cleaning up moldy bathrooms & preventing future mold growth
InspectAPedia tolerates no conflicts of interest. We have no relationship with advertisers, products, or services discussed at this website.
How to clean up or remove mold in bathrooms:
This document explains how to best to remove & prevent future mold contamination in bathrooms, including bathroom renovation tips - easy details that will help mold-proof your bathroom. The article includes a discussion of steps in restoring loose, discolored, or moldy, damaged tile grout.
Small amounts of mold can be removed simply by cleaning or removing infected materials, something most homeowners can handle. Use any household cleaner or bathroom cleaner to clean off mold from tile, grout, or other hard surfaces.
We also provide an ARTICLE INDEX for this topic, or you can try the page top or bottom SEARCH BOX as a quick way to find information you need.
How to Remove and Prevent Bathroom Mold
 How to Clean off mold on tile, grout, or caulk
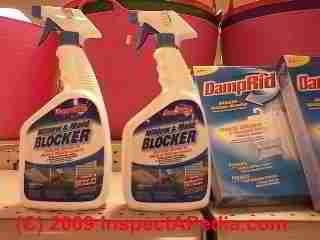
You can use a fungicidal cleaner such as the product shown at left if you like, but any household cleaner, even plain soap and water will do fine. It's the cleaning that is important, not surface infection, when we're removing mold.
Preventing future mold growth can be assured more reliably by fixing the conditions that invited it in the first place, rather than by relying on mold killing sprays.
Bleach solution to clean off mold is not necessary - the object is to remove mold, not kill it.
But since cleaning off surface mold may leave stains in the tile grout, you might prefer to bleach that surface anyway. If you are going to use bleach to clean mold anyway, perhaps for cosmetic reasons,
see MOLD CLEANUP with BLEACH for more advice.
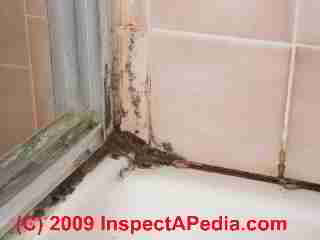
Handling Hard-to-Remove Brown or Black Mold Stains in Tile Grout or Caulk
Before giving up on mold-stained grout or caulk in a bath, kitchen or other area, try first drying the stained area, then spraying it with a bleach-based tile cleaner. Let the cleaner sit on the surface for 24 hours before washing off the surface. As long as you are dealing with a ceramic surface, the spray won't damage the tile or marble and you will probably find that the stain diminishes or disappears completely. Two or three such treatments will usually remove just about all dark stains on grout or caulk in a bathroom or other area.
Watch out: don't over-do it with straight bleach. The straight-bleach solution may be strong enough to damage building surfaces, and it's not normally necessary.
You may find that moldy caulk just won't clean up - you'll need to cut and remove the old moldy caulk, clean the tile or tub surfaces thoroughly (we use alcohol), and re-caulk with a mold-resistant bath caulk.
You may read that your bathroom caulk is "mildew resistant" which is funny since there is no mildew in buildings - mildew (a sub group of the larger group of molds) grows on living plants - unless you are growing grapes in the bathroom, it's mold, not mildew.
But forgive the sloppy language and buy mildew-resistant caulk anyway.
Cleaning mold or other stains from paper or other delicate surfaces
Even when removing brown rust and water stains from japanese Shoji screens I never use straight bleach. The risk of damaging the material is just too great. For those delicate surfaces, copying the work of art conservators, I work with a the most gentle, dilute solution possible, with patience, even with a cotton swab in some situations.
For paper and other delicate surfaces I use a dilute cleaner on a cotton swab and I watch for the stain to fade. Quickly I clean the treated area with clean water and gently pat it dry. For more expert advice on this topic see BOOK MOLD, CLEANING
Stained or Moldy Tile Grout Restoration: grout saw vs bathroom caulk vs. the Magic Tile Pen®
Badly damaged tile grout joints that have grout sections missing or loose will need to be cleaned more aggressively. You may need to use a grout saw to remove enough grout to re-grout the tile with a new grout mixture.
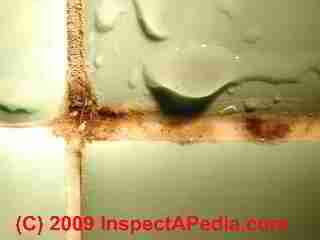
Buy tile grout that is secure but stained (such as in my photo below) can be scrubbed, dried, and coated with a tile grout pen or if the tile grout joint has enough depth to accept a thin coating of caulk, ou can try using a mold-resistant silicone caulk in the stained joints.
Here we will illustrate the use of a white grout marking sealing pen to beautify stained bathroom tile grout. This approach works best where surface mold has been cleaned away and it will not work if there are leaks inside the wall cavity.
The tile pen can seal hairline grout cracks, but it will not work well if the existing tile grout is not sound and securely in place.
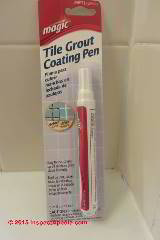
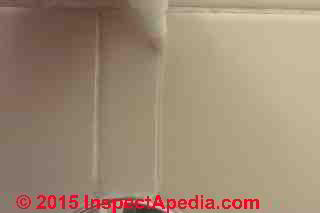
The Magic Tile Grout Pen is a lacquer coating that will seal stained or moldy tile grout leaving a white surface. As long as the tile grout staining was caused only by water (and airborne mold) exposure on the exterior or room side of the tiled wall, this approach works well, has proven durable (our sealed grout has not shown new staining in six years since this coating was applied).
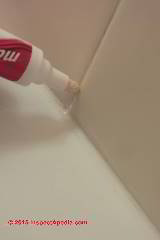
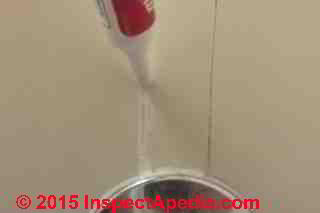
Step in Using a Tile Grout Coating Pen
- To use the tile grout coating pen you will want to clean the tile and tile grout as thoroughly as you can, repair any grout joints that are completely void of grout, and then be sure that the wall surface is completely dry.
- Shake the tile grout pen for two minutes. This mixing is important or the white pigment may be too thin in your coating.
- The tile grout pen is spring-loaded and will have to be pressed "in" a few times to get the white coating flowing to the pen tip. To avoid making a mess on your tile surface you might want to prime the pen by pushing it on an extra tile scrap or onto a similar hard clean surface.
- The instructions say to just apply the pen to the tile grout, not to the tile surface. You'll see below that depending on the width of your tile grout joints you won't be able to do this perfectly. The company says use a damp paper towel to wipe off excess tile pen coating. Below you'll see my approach using a thumb. If the coating has dried where you don't want it you'll need to use a single-edged razor blade and/or lacquer thinner to remove it.
- Let the tile pen coating dry for 12-24 hours before using the bath tub or shower in order to be sure that splashed water doesn't ruin your job.
Watch out: however if there are leaks into the wall cavity there is risk of both hidden mold contamination in the cavity but also of early failure of any external or superficial treatment of discolored or moldy tile grout. In that case you may need to remove the moldy materials, fix the leak, and then restore the wall.

In the two photos above we illustrate applying the tile pen to a stained segment of tile grout in a bathroom in Poughkeepsie, New York. If you click to enlarge the image you'll see that my hand was not very steady and some of the white lacquer spread over the ceramic tile surface.
I simply wiped the excess away (photo at above right), though may be smarter to avoid coating your thumb with white lacquer - a possible toxin.
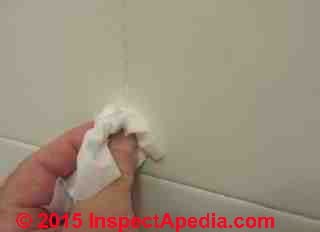
Wiping the lacquered magic tile pen coating with a tissue is a bad idea: you're likely to leave lint and paper stuck on the surface. If necessary use a lint-free cloth dampened with lacquer thinner to remove spill-over lacquer from your tile tune-up job.
Guide to Renovating & Improving Bathrooms to Avoid Future Mold Growth
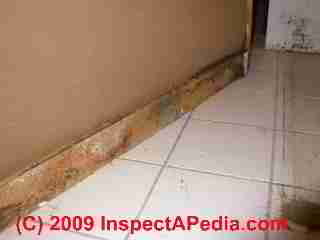
At Bathroom Vanity Cabinet Mold we explained how water running under or behind a bathroom vanity or sink base can cause hidden mold growth on the vanity back, under-side, and on the wall behind the unit. Our two photographs just below show mold that was found on the chipboard vanity base back surface and on the drywall behind the vanity.
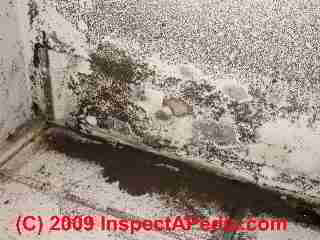
The drywall behind the vanity looked bad enough that we explored the wall cavity to be sure that additional demolition above the moldy drywall itself was not needed.
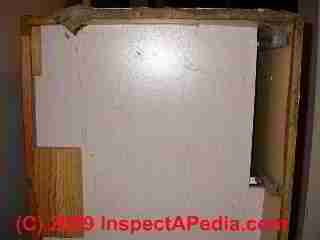
Here we show the underside of the bathroom vanity cabinet. At the top of the photo, in particular, you can see that the chipboard vanity side was swollen and damaged by water that had passed along the bathroom floor.
We decided to toss out this vanity base rather than try to clean and repair it. Placing our new bath sink vanity base upside down, we sealed the bottom edges as well as all other un-coated surfaces on the vanity back (and front kickboard) before the new unit was installed.
We continued mold-proofing this bathroom with the details listed just below.
How to Prevent Mold Growth in Bathrooms, Kitchens, Laundry Rooms
After cleaning up a moldy bathroom, or when renovating or when constructing a new bathroom, we take these steps to reduce future mold growth:
- Install a high capacity low sone (quiet) bath vent fan, making sure that the fan is properly vented to outdoors and that fan duct condensation will drain outside and not into the ceiling space.
See HUMIDITY CONTROL TO PREVENT MOLD
- Install sliding glass tub doors in baths where users are careless with shower curtains (that also grow mold, especially cloth shower curtains) and for people who splash water onto the bath floor
- Seal the un-coated hidden sides of new vanity cabinets, such as the vanity bottom edges, back and under-side before installing the new vanity. We use a spray shellac but any water resistant coating will do. Coating these surfaces reduces their moisture uptake and thus increases mold resistance.
- Seal exposed drywall: in a laundry room or other area subject to water splashing you might want to paint the drywall with a semi-gloss or even a glossy paint that is more water and splash resistant than flat latex wall paints. If renovation in such areas is needed, use cement board or greenboard. I'm not sure that
DRYWALL MOLD RESISTANT is necessary or worth the cost.
- Select bathroom caulks & sealants that include a mold-resistant chemical additive. (Most modern bath caulks include this feature - which is a good reason to use caulks designed for use in the bath. You may read on the caulk label that the sealant is "mildew resistant" - which is ok, if technically nonsense (mildew, a subset of the huge mold family, grows only on living plants -
see MILDEW in buildings ?).
- Caulk the sink vanity to the floor to be sure that spilled water from a shower or tub does not run below the vanity as we explained at
PHOTO GUIDE TO MOLD Under Vanity Cabinets. We used clear caulk at the exposed vanity edges where they contacted the floor, extending caulk up the vanity sides as well. Against a white drywall bathroom wall use white polyurethane caulk for better appearance and easy cleanup.
- Caulk the floor trim at floor level - if installing new trim, run a small bead of caulk along the bottom edge of the trim boards before they are nailed in place - you won't see the caulk but you'll keep water out of the wall cavities when it spills onto the floor.
- Clean the tile surfaces after showering - use a squeegee to clean water and soap scum off of tile walls and shower doors - they will look better and you'll be reducing the organic debris on those surfaces, thus reducing mold growth.
- Do not leave very wet towels hung from hooks anywhere; spread them out on towel racks to dry, or put wet towels into the laundry. One of the moldiest closets we found in a home without other leaks was caused by an owner who daily hung his very wet towel on the back of the door to a tiny, clothes-filled closet, closing the door trapping moisture there.
- See CONSTRUCTION DETAILS TO AVOID MOLD for additional details about mold-resistant construction.
Watch out: in most circumstances it is not necessary to test mold to identify the genera species. That information will not change how mold should be removed or prevented in buildings.
But on occasion, such as for medical reasons or for control of a larger, costly mold remediation project, there are reasons (MOLD TEST REASONS) to identify mold on surfaces or in building air or dust.
Reader Comments & Q&A
Sorry to say some of that mold looked dark and thick enough that I suspect the drywall is a bit invaded to just "paint-over". Still if you're certain that there was no leak from above, you can ignore the standard "best practice" advice (replace the drywall) and try cleaning, disinfecting, drying, painting with a fungicidal sealant, then painting with finish coat; see how long that lasts.
Dan, since there were no leaks (would you believe I actually typed "link" instead of "leak," and had to backspace to correct it?) from above, I'm thinking your #3 opinion below applies here. But I'll send you the pics as you suggested.
finding and fixing the exact link cause as
should have read
finding and fixing the exact LEAK cause as
Certainly, Kevin. Use the page top or bottom CONTACT link to send photos along with the bath leak history. Here is some general opinion:
1. If there were leaks into the bath ceiling from above, because there is likely to be mold contamination in that cavity, particularly on drywall, possibly on wood surfaces, and in insulation if the cavity is insulated, a paint-and-forget approach may not be the best idea; it's worth at least some test cuts and exploration of the cavity to assess conditions there including finding and fixing the exact link cause as well as the extent of mold to be removed.
2. If there were no leaks into the ceiling cavity but there was extensive mold growth invading into the paper of the drywall in a bath, I'd consider cutting out and replacing that material, as it is pretty much impossible to actually clean and remove mold that has grown into the drywall paper and gypsum. You could paint and forget but ultimately you have a good chance of receiving a reminder later on - mold growing out through your paint job. Using a fungicidal paint retards such mold regrowth but despite all of the fantastic claims of "forever mold free" paints, the actual chemistry of the fungicide and its half-life of efficacy have not been well demonstrated. At least I've not found independent studies doing so.
3. Despite my "do it right" advice of always removing moldy drywall, to be perfectly honest, if I had what I considered a trivial amount of mold growth - a square foot or less, say - that I could almost entirely wipe-off of the ceiling surface using a household cleaner and paper towels, and if I were confident there were no leaks into the ceiling cavity, I'd clean the moldy surface then paint it with a lacquer primer sealer or a fungicidal paint as a primer coat, followed by my finish coat. I prefer to use gloss or semigloss alkyd in bathrooms though I might use a semi-gloss latex too as those harder paint finishes are more moisture resistant and easier to clean than a flat wall or ceiling paint.
Duct-tape Dan.
Inspectapedia is the duct tape of the internet: a million uses, and essential to the homeowner. Is there any way I could send you guys a couple before-and-after pics of my bathroom ceiling mold cleanup? I am trying to figure out whether I need to tear the ceiling apart to find hidden mold, or just paint and forget it?
Lily
It is not justified nor necessary to call a mold remediation expert to repair small areas of mold contamination such as in bath tile grout. Only if in the course of repair you discover an area of mold contamination larger than 30 sq.ft. of contiguous moldy material would professional remediation be appropriate.
I need to remodel a bathroom and there's mold in grout lines, and along shower floor. It looks like we have mold too at bottom corner of cabinet where it meets shower. Grout is also starting to just pop out in certain areas. We used to see a yellowish stain on the wall above the tiled wall inside shower but we had roof repair done last summer and since then, we don't see the stain. I did clean the wall with vinegar and water. Should I call a mold remediation expert before doing any demo or should I let the contractor take care of it?
Question: do bugs cause mold growth?
(Sept 18, 2014) Anonymous said:
had a table lamp cover with a string type woven cover for more than 10 years now suddenly notice white hairy/fuzzy like cotton balls growing all over ... threw the lamp out ... but cannot figure out if a bug caused the growths, a fungus, mold ?
Reply:
Anon,
Sorry I can't identify what's on your lamp from just your text. But bugs don't cause mold growth. Fungus = mold. However we might find mold growing on a dead bug.
...
Continue reading at BROWN HAIRY BATHROOM MOLD or select a topic from the closely-related articles below, or see the complete ARTICLE INDEX.
Or see these
Recomended Articles
- HIDDEN MOLD, HOW TO FIND - home
- MOLD APPEARANCE - WHAT MOLD LOOKS LIKE
- MOLD APPEARANCE - STUFF THAT IS NOT MOLD
- MOLD BEHIND MARBLE or TILE
Suggested citation for this web page
BATHROOM MOLD REMOVAL / PREVENTION at InspectApedia.com - online encyclopedia of building & environmental inspection, testing, diagnosis, repair, & problem prevention advice.
Or see this
INDEX to RELATED ARTICLES: ARTICLE INDEX to MOLD CONTAMINATION & REMEDIATION
Or use the SEARCH BOX found below to Ask a Question or Search InspectApedia
How To Clean Moldy Tub Caulk
Source: https://inspectapedia.com/mold/Bathroom_Mold_Cleanup.php
Posted by: lovellgeopers.blogspot.com
0 Response to "How To Clean Moldy Tub Caulk"
Post a Comment